Page Builder > Extending Functionality
Customize Website Settings
Learn how to add new website settings fields, and render them on the website.
This feature is available since Webiny v5.34.1.
- how to add a website settings group in the Admin app
- how to extend website settings GraphQL schema
- how to render the new fields in the website app
Webiny Page Builder provides a module for managing your most common website settings, like website URLs, homepage, favicon, logo, social media links, etc. However, sometimes you need to add your own settings. To add a new group of fields, store them to the database, and retrieve on the website, we need to do 3 things:
- Add new inputs to the Website Settings view in the Admin app
- Extend the GraphQL schema, so it is aware of the new fields
- Add the new field selection to the Website app, so they are returned by the GraphQL query
The end result will look like this:
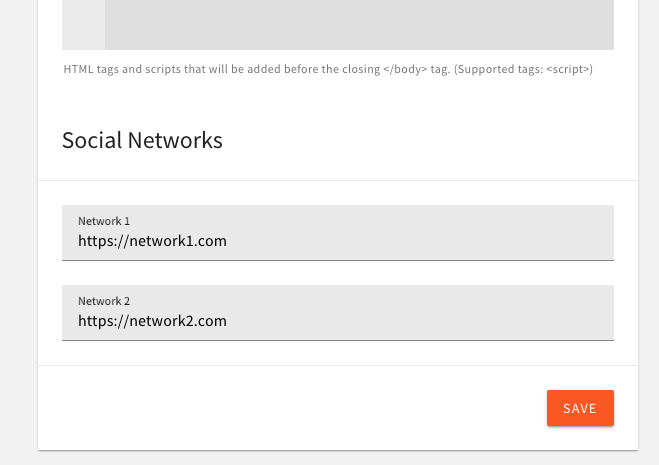 Social Networks group in the Admin app
Add a New Group of Fields
First we need to create a component that will register the new group of fields. Create the following file in your apps/admin/src folder:
With this we’ve created a new group called Social Networks, and told Webiny what fields to query and mutate when settings are saved. We also added two inputs to the settings form, and connected them to the form data using the Bind component (this establishes a bidirectional connection between the form and the input).
Now register this component in the Admin app:
At this point, the Admin app will throw an error saying that network1 and network2 fields do not exist in the GraphQL schema. Move on to the next section to update the schema.
Extend the GraphQL Schema
In your GraphQL Lambda function, add the following plugin to the bottom of the plugins list. Note that you can’t copy and paste this file; you’ll have to add this manually into the source code.
With this we’ve extended the GraphQL schema, and added two new fields to the PbSettings type. You can add more elaborate types, make them nested, etc. For this example, this simple approach will suffice.
Deploy your API, by running the following command:
Once deployed, reload your Admin app, and you should now be able to save your new fields.
Render Fields in the Website App
Before we can render our new fields, we need to add them to the GraphQL query selection in the Website app. Create the following file in your Website app (you can copy and paste the whole file):
When this component mounts in the Website app, it will register an AddQuerySelectionPlugin plugin, which will add your fields selection every time the PbGetSettings query is executed.
Now register this component in the Website app:
The last thing to do is to add your new fields to the website footer. To do that, we need to edit the website’s theme. For simplicity, we’ve attached the whole file for you to copy and paste: